
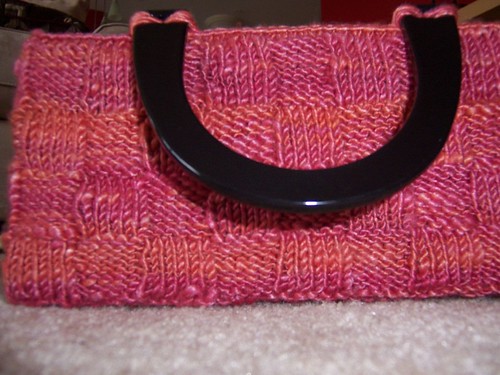
I posted this purse on Craftster, and got some great feedback and requests for a pattern. I'm going to write a general description here of how I went about making it, and then will (eventually) put together a comprehensive tutorial. The tutorial requires me to start over from the beginning and document the whole process, as well as streamline it a bit. What follows is just a description of what I did - some of which I would(will) do differently the second time around. If you're an inexperienced or unadventurous knitter, I would recommend waiting for the full-blown tutorial. Otherwise, feel free to use this as a guideline, and have fun!
- I spun my own yarn. The fiber is a merino/tencel blend from Chameleon Colorworks, in the Indian Wedding colorway. I'm not going to tell you how to go about spinning, because there are far more experienced people than I who can do a much better job. I think the resulting yarn was approximately worsted weight.
- Gauge is not terribly important for this project. Make a swatch in whatever yarn/needle size you'd like to figure out stitches and rows per inch. The purse is started as sort of a tube. To determine how many stitches to cast on and how many rows to work, figure out what you'd like your dimensions to be (or just wing it), and figure out the perimeter measurement (if you want a 3x9 bag, it would be 2(3)+2(9) = 24"). Multiply this measurement by the stitches/inch, this is how many stitches you'll cast on.
- I used a provisional cast-on for this purse. Next time I will do it differently, but I'm not going to discuss that now. I think there are better ways to do it, but the provisional cast-on is what I used in this case.
- Cast the number of stitches you want onto circular needles. They should be approximately the same length as you want the perimeter of your purse to be, so you're not pulling or trying to cram on too many. Join to begin knitting in the round, being careful not to twist the stitches.
- To get the basket weave effect, I did *k5/p5* for I think 8 rows, and then switched to *p5/k5* for another 8 rows. For me, the 5st/8rows yielded approximately 1" square. If you want the squared look, be sure to pick stitch and row counts that result in a square, otherwise you'll have a more rectangular look (which is perfectly fine too).
- Repeat in the pattern until your purse is the desired height. Bind off.
- The bottom is where the tricky part is, and where I made it more difficult than it needed to be. Take the stitches from the provisional cast-on, and place the number of stitches you want for one long side on your needles. It helps to put the stitches from the short sides onto another set of needles of the same gauge. Continue knitting in the same basket weave pattern as the sides. As you go, knit the first and last stitches of the row together with the stitches on the short sides. This can be tricky as there may be a different number of side stitches than you have rows. The point is to try and join the bottom to the sides evenly, so the squares line up and you end up with a solid fabric. When you've knit to the end of the bottom, seam two long sides together using your preferred hidden seaming method.
- Break the yarn, and you're done with the knitted portion!
I'm going to post directions for how to construct it in a little bit. And again, this isn't a very good or complete tutorial. I am planning on putting together a comprehensive set of directions with pictures/diagrams/etc., so if this is too confusing (which it probably is, this is my first attempt at creating a pattern) hold on, there will be better instructions as soon as I can write them.
Thanks so much!
2 comments:
This purse is adorable. I fell in love with it the moment I saw it on craftster. Very, very cute!
I like your purse pattern.
It is just the shape of purse I like to use.
I look forward to you writing up your pattern.
Thank you
Post a Comment